Sunday, 16 March 2014

Day Ten

Last night I tried to attach four little pegs to a flat bracket, as you saw. This morning I went to try and clean it up and at the very first touch it fell apart. Maybe this styrene glue of mine is old, has gone off. This part is, so far, the hardest thing I have tried to do. We are talking about sticking four bits of rod to something. Ach. Put it in the too-hard basket just for now. There has to be a way, I just haven't thought of it yet. No good working on something that is upsetting me. 


So I'll get on with something else. Early on we looked at the muffler. Here is that picture again to remind us of what we are trying to achieve.


I thought this might be difficult but really all I have to do is saw a piece of aluminium tube at the right angle, and I have no trouble with that. Any mess just gets filed away. Before I saw it I ream out the end of the smaller part with my knife as it will be harder to do once I cut the part free.The other section is long enough that I won't have any handling problem.

There's the first attempt. I got pretty close but the angle wasn't quite right. It's joined with superglue.
So I have another go. And another. This one is a keeper. Sixth attempt.


I have to say, I consider this an improvement.


I'll keep this plastic part, the exhaust pipe itself. I need to do a few things though. I need to drill out the business end - easy-peasy. But where the exhaust pipe goes into the flame damper (that's what that big elbowy thing is - it was to hide any sparks or flames at nighttime) we have what looks like a nightmare. That disc on the exhaust pipe has to come off and so does the little collar. 

I don't know if you have Milo where you are - chocky drink. It comes with this steel foil seal, very useful stuff. I got this one out with the minimum of crumpling. I will try to make those fins inside with this material. The little hose-clamp part doesn't bother me, that will be fairly easy, but those fins/braces look hard.
Speaking of drilling, these are pin-vices. I have quite the collection as you can see but I use this aluminium one by Proedge pretty much exclusively because it is so light, meaning it is less likely to break the finer drill bits.


I want this yet thinner but we are in the danger zone; The plastic is starting to whiten under the stress and if I push it the rim will break. Still I have options. I can move the drill about a bit, angle it. And I can put the point of my knife in there and twiddle it ever so gently with the only force being the weight of the knife itself. With a blunt blade, not a sharp one.


Okay, we have been trying all sorts of things. As you can see, I tried to bend up the braces with the thin sheet steel. I am not doing too well, as you can see. But then, a stroke of genius! I decide that before I can put these details on I really need to put the plastic exhaust pipe and the metal cover together. There on the right, that's a cigarette filter, and it sleeves snugly inside the elbow joint. All I have to do is cut off a bit of it, poke the exhaust pipe through the middle, and slide the whole thing inside the damper. Then, when I've got everything perfectly lined up, I can inject diluted Aquadhere into the filter and it should set fairly firm. Now the whole thing will be stable enough for me to apply the last remaining details. Do I dare to put that dent in it? Knowing I could so easily break it? I guess I can do a trial with one of the earlier attempts. 

This is what I mean. I will fill those ejector pin marks, don't want anyone looking up my muffler and finding something wrong.
This cigarette filter was such a good idea. And on that high note let me bid you good night XD

Saturday, 15 March 2014

Day Nine

Day Nine is very trying.

I see the remaining gaps but I'll attend to those when I have finished construction and am touching up. I'm a little disappointed but I know that a bit more scraping with the knife, a bit of filling, and then paint will cover it all up/bring it all together.

Stick the bloody thing on and try not to think about it too much right now. Holes on the right gave me much trouble. I filed down until they became visible, like the ones on the left side - but I could see daylight through them. I soldered that spot and filed it all away - I could still see through the holes. I wondered if the Araldite, flux and solder were reacting strangely under heat, so that solder would not stick. Finally I had the idea of probing them gently - perfectly solid. The holes on the right are filled with Araldite. Okay, fine. 

Hooks for the jack. I try copper rod first but it's hard with only forceps or the Hold and Fold. I return to old ways, stretching sprue. It's much easier to shape the hooks now. I make about ten and take the best two. They are not perfectly aligned but by the time they are painted (dark gunmetal) and in their brackets, and dirty, I seriously doubt anyone will notice.

Little brackets for holding tools to the trackguards. They take some figuring out and it doesn't help that they are tiny.
 But it can be done.


And I can stick this one on. Looks like it's for holding an axe but my book doesn't show what's going on here.
This bracket is for a sledgehammer. There are pictures in the book and it looks easy enough to make. However, from the photos I have, I think this bracket might be a little small.


Around about now, looking at the pictures in my book, I realise that my rear track guard attachment difficulties all arose from my mistaken belief that they were level, not sloped. I pull them off and refit them at a properly rakish angle. Not shown, the terrible mess where the track guard joins the hull above the tracks. Who cares, there's going to be mud there anyway.And you won't be able to see up there because of the armour skirts.

This bracket at the rear has pegs for holding various antenna parts.


This is the part. I have to make the peg parts myself.


I use styrene rod, four pieces held close under some sellotape.
That makes it easier for me to cut them all at once with the chisel blade.
Pegs ready to go.
Pegs glued to bracket. Really difficult as I can't quite focus on such small parts. Doesn't seem good enough to my naked eye so I scrape all this off and clean up the brass part. Then I see this photo and wish I hadn't, because with just a bit of very gentle filing this would have been fine.


I use a bit of aluminium tubing for this.

And this is what it's supposed to be, a 'distance keeping' or 'driving-in-column' light for use at nighttime or in poor visibility. I can think of one way to get the green and red happening, and that is to cut out those shapes from spare decals. Or could I cut out the shapes I need in foil and wrap that around an assembly of green and red plastic rod. But I think I might be pushing it; the part is only about five millimeters long. From photos of a few different vehicles I find some variation in the form of the protective guard over the top; I make a sort of average of them.

Looks not so bad. In the photos it seems there's a bit of wiring coming out the back but the wire is loose, doesn't attach to anything. I think it will be all right to run that wire into the gap between hull and track guard. I certainly won't be guessing where to drill holes in the hull.


Last thing, I put this little welded step together and mount it to the hot air vent cover. I will file away that irregularity on the nearmost edge.


That was a long day, and my back aches. I will repair to the couch, there to watch television and consume various snack foods.

Nah, that antenna bracket is getting to me. There's just no way I'm going to get a clean result trying to butt-join plastic rods to brass. I'm just not that good. Out with the styrene card and rod.


After about six goes I get a fair result with the styrene. I will leave this to dry overnight, then I'll cut (melt?) off what I don't need from the back. If the back is messy I won't be able to fill it but I'll be able to file it smooth then paint it over with the styrene glue, and that should seal the deal.


Okay now I really am calling it a day.

Friday, 14 March 2014

Day Eight

So we should be able to finish up that toolbox now. Left to do: fill the perforations in the back and front, make a hinge out of plastic rod, fit the little buckles from the brass-etched set. I have the option of roughing up the lid a little but I'm thinking maybe I won't push my luck, and let's just concentrate on making good the ruined part. The muffler's going to have a nice dent in it anyway, let's not overdo things.


Get yourself a mirror or a bit of glass for mixing glues, putty etc. When you run out of room you can clean it all off with a chisel or something like. 


How am I going to fill all these holes? The Tamiya putty has some grain, it's a bit 'chalky' for want of a better word. Mr. White Putty is closer to plastic, is finer, but I'm not sure how well it sticks to brass; I will find out. I have other options. If the white stuff doesn't hold up I will poke and scrape it all away, and then I will glue card on the insides as backing and fill the holes with mm Araldite? I reckon that might work. When it's sanded there is still the strong possibility that traces of the holes will still be visible. If so, I will be able to put a thin coat of some lacquer over it all.


So let's give it a whirl. I squish all those sausages of putty together to make some sort of *substrate*. I am suddenly feeling a little skeptical about this 'solution'. I probably should have filled those holes with SOLDER. But I will sand down one side and have a look at it first. If I'm not happy I can easily remove this white stuff and start again. The macro photo shows me that one of the lid's lips is still too deep. This I have fixed now.


Well that didn't work at all. It's going to have to be solder. It takes me about one minute to get the white putty off with the chisel blade and a needle. And I fold up the lid now and it is just perfect (corners to be filled and filed, naturally). But of course it doesn't fit, and that is a shame. But not really a problem, because I can easily knock one up from my stock of sheet metal.


Okay, so we'll try with solder. Check this out, the brass sprue comes with little hexagonal holes all around the edge. I wonder if the idea is to fill them with solder or putty which when pushed out become little bolts? That would be brilliant. But more to the point, I can use one or two of them to test out the soldering! 


I have the good stuff from Tix. It melts at a much lower temperature than normal; I think it has more silver in it or something.

So here is a good little how-to: Railroad Model Craftsman


Test seems pretty successful. 
I taped it to my mirror and this is the back.


I mentioned before that I am not skilled at soldering, but this looks okay! The heat seems to have distorted it a little but that is no problem to fix. Now to file and sand, for quite a long time by the looks of it. Best to mount some sandpaper to something dead flat and go very slowly and carefully or I'll end up ruining the corners. I think we are in the home straight now.

Sandpaper: I bought up big on Tamiya Finishing Abrasives and I am very happy with them. There are plenty of other brands. Do NOT buy cheap sandpaper. It is not consistent as regards particle grade so you'll end up with scratches, that is if it does not just disintegrate. When you mount it on a flat backing you need to clamp it with another flat thing (especially if you use something water-based like PVA which will make it want to curl) - blocks of wood and clamps. Spray glue is good for this actually, but I don't have any.

I cannot believe how well this came out. I am ECSTATIC. I will use my finest grade of sandpaper to get it to mirror polish. Then I can fill the edges and sand them very lightly, make the new lid and a hinge, and whack it all together. I wish now that I'd soldered instead of just 'setting in place' with Araldite. But it hardly matters, it's a ten minute job to get a bit of filler onto any gaps and sand  smooth. Nathan happy :D

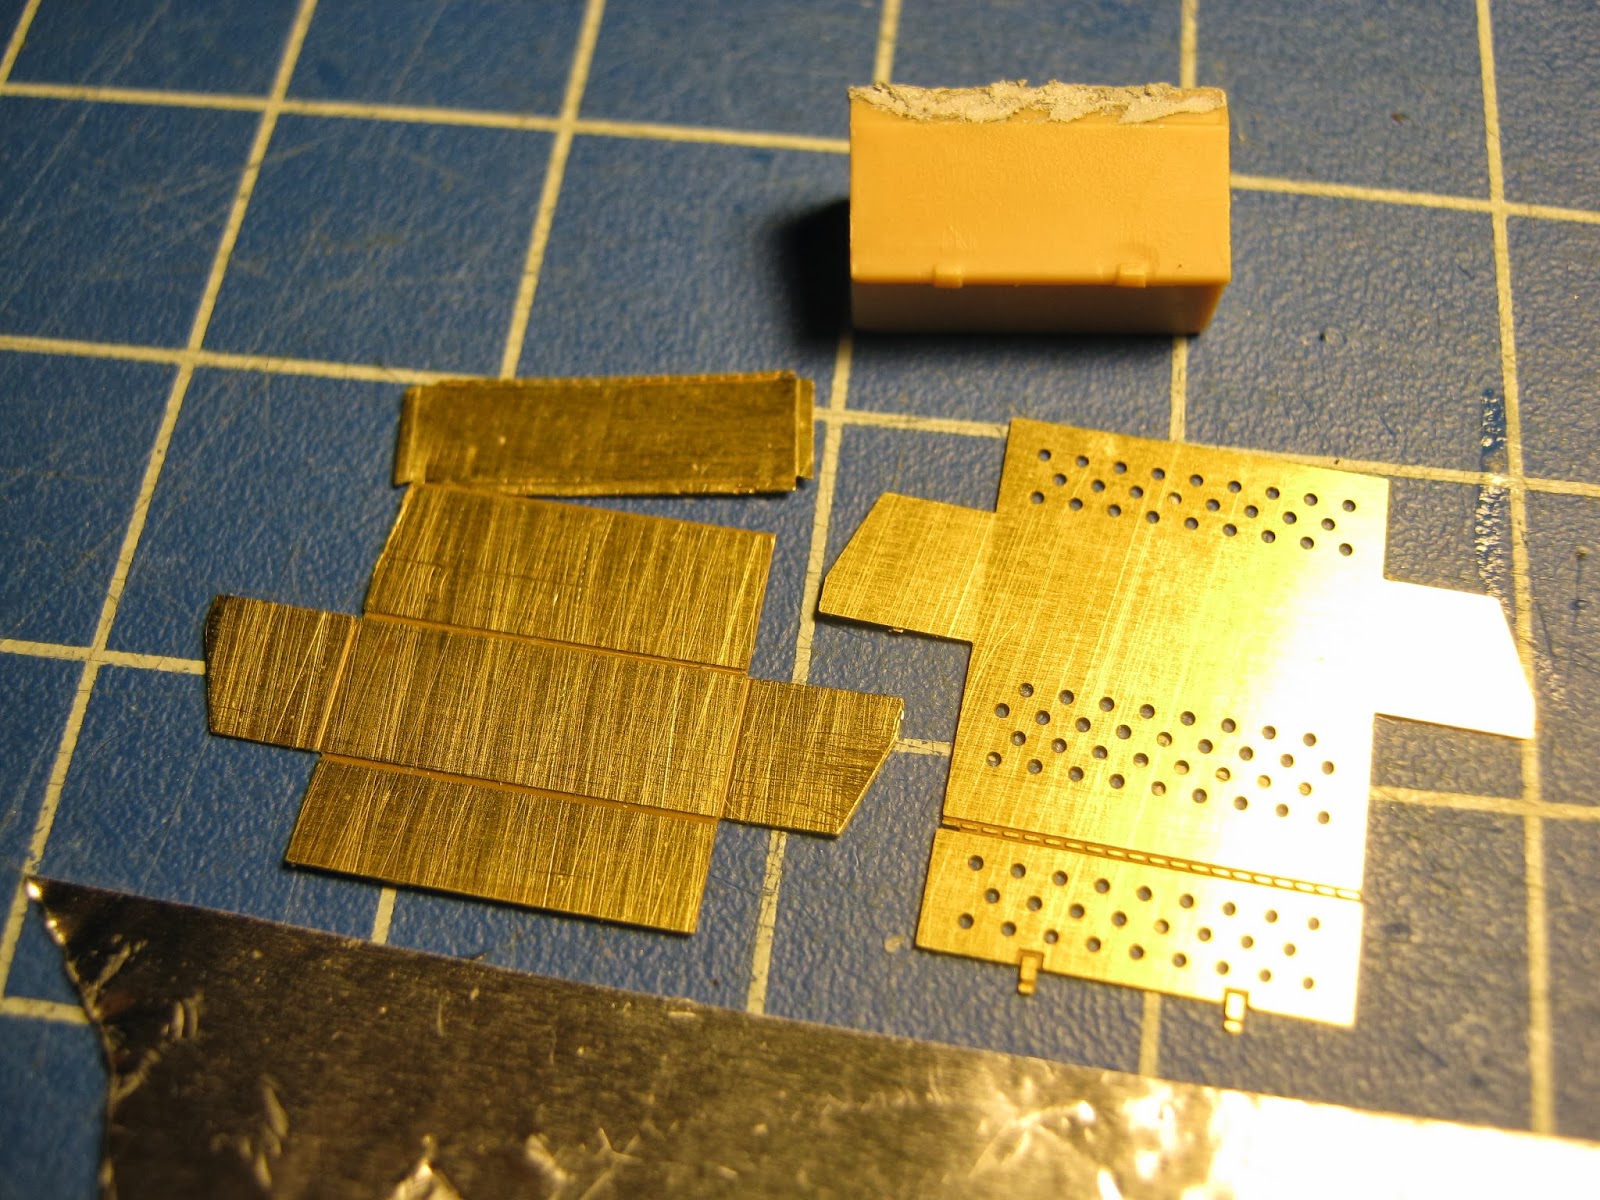
Now let's see about that lid. I'v realised there is enough material in the brass sprue to do the job. Pictured below: the ruined original part, the new part that because of a stupid miscalculation was too short, and the new lid I cut out and filed, and scored, and bent, which fits so sweetly.

Let's look at the real box now, as there are a few small issues to clear up.


So from here on in my task is easy. I must make the lip of the lid finer - fifteen minutes of filing. I must build a hinge with five sections. Toolboxes from two different vehicles are pictured. We're doing the later one in the last two photos. we get a bit of a bonus; the later version is more angular so I won't have to try to model the roundness in the corners of the lid. Compared to the brass part (see earlier photo of the part) the real tool box had a much simplified hinge, with only five - 'barrels' is the correct term for the parts that curl around the pin or pivot (last photo) - I am reliably informed by  Hingeipedia. One piece of plastic rod, .5mm diameter being closest, scored carefully all around with a (brand new) blade, should work just fine. I may have to do that two or three times, or I may get it first time - IF I AM CAREFUL tee hee. Finally, attach the little latches and this one's in the bag.

Two days and then some. Not full-time, but close to. The moral of the story is that you should not rush. Not try to get to the end point, focus on the now. Be present. It's the journey, not the destination, live in the moment etc. If I had been careful in the first place, this part, this job, would have taken half an hour instead of fully two days. And I still do have work to do.

Onward and upward.


Thursday, 13 March 2014

Day Seven

I have to tell you I was feeling a little discouraged yesterday. I seemed to be not in the zone. Today was much better though :)

Tiny tiny buckle thingies, bent just right. My problem - your problem, every model-maker's problem - is rushing. Not slowing down. Not taking the time to think every little step through. Not being prepared, with all the tools you need set out ready. Winging it, hoping for the best.

Putting a tiny dab of superglue in the right place, that is not so hard. I used the slower-setting 'gel' stuff and it seems to be pretty good but still you don't get much time or leeway. I have a collection of tweezers, about fifteen of them, two of them really expensive, around $150. I used my best ones. Seriously, landing these tiny parts on the dab of glue and pushing and prodding them into place was probably not much easier than docking with a space station. But I managed.

I wrestle with the track guards and finally get them on. Some small alignment problems but overall they are cutting it. More than I can say for this so-called WYSIWYG blogging tool from Google. What I'm looking at now is beautifully laid out. Sorry what you read is all over the place.


Okay, we have some catch-up stuff to do. I totally messed up this toolbox (on the left there, the later version was not perforated). Somehow I didn't put it together square, then I tried to file it into shape, and - disaster. You can see where I lost it on the top left of the original part. At first I thought I would make do with the kit part (so I filled a gap at the back) but that's not on; the brass etched toolbox is a real star and I can't do without it. I also used what I had as a template to begin cutting out a new one from foil-thin sheet steel but then I had a better idea. Luckily, the brass set comes with both early and late boxes. So this is the plan: I'm going to make up the 'early' box, fill the holes so now it's a 'late' box. I will have to cut away and replace the lid. I can make a new lid from the old, ruined part.


Step One: cut the lid off the new box. This time I am really CAREFUL.
I fold it up CAREFULLY.
 Like so.
And this time I get something I can be happy with. We can see a bit of daylight through the cracks but that's not a problem, they will be filled. It is important only that the thing be nicely squared up.
I get the old lid, I roll it flat with the handle of my craft knife, I put back the folds.
Because it's had such rough treatment from me it actually looks fantastic, all dented and bent up, but there is a problem ...
Where I cut through the hinge to remove the lid the kerf is too wide. I cannot use this lid, sadly.
Instead, I am going to use the old, damaged, box to make the new lid.
I take my time and score where I am going to remove the unwanted material, the top half.
I succeed! Next, I am going to remove the material from the box sides in order to leave the lip of the lid. I use the tape to give myself a guide.
I was careful and left plenty of margin so I would get the depth of the lid's lip right. I could have trusted myself and cut closer but I'm going to file it down and I would much rather be removing material than trying to put it back.
I'll file that lid later while I'm watching TV. But for now, back to the box part. I am mixing Araldite (epoxy). I am going to run generous amounts of this glue into the corners and edges inside. This will make the box strong enough to handle filling all the perforations and the outside edges too. It's late now so we'll continue the toolbox capers tomorrow :p