Tuesday, 11 March 2014

Day Five

Day Four actually - I just couldn't stop. It's quite addictive drilling out little holes. All the links are done and ready to go together and to go on the vehicle. So into the box they go, done.

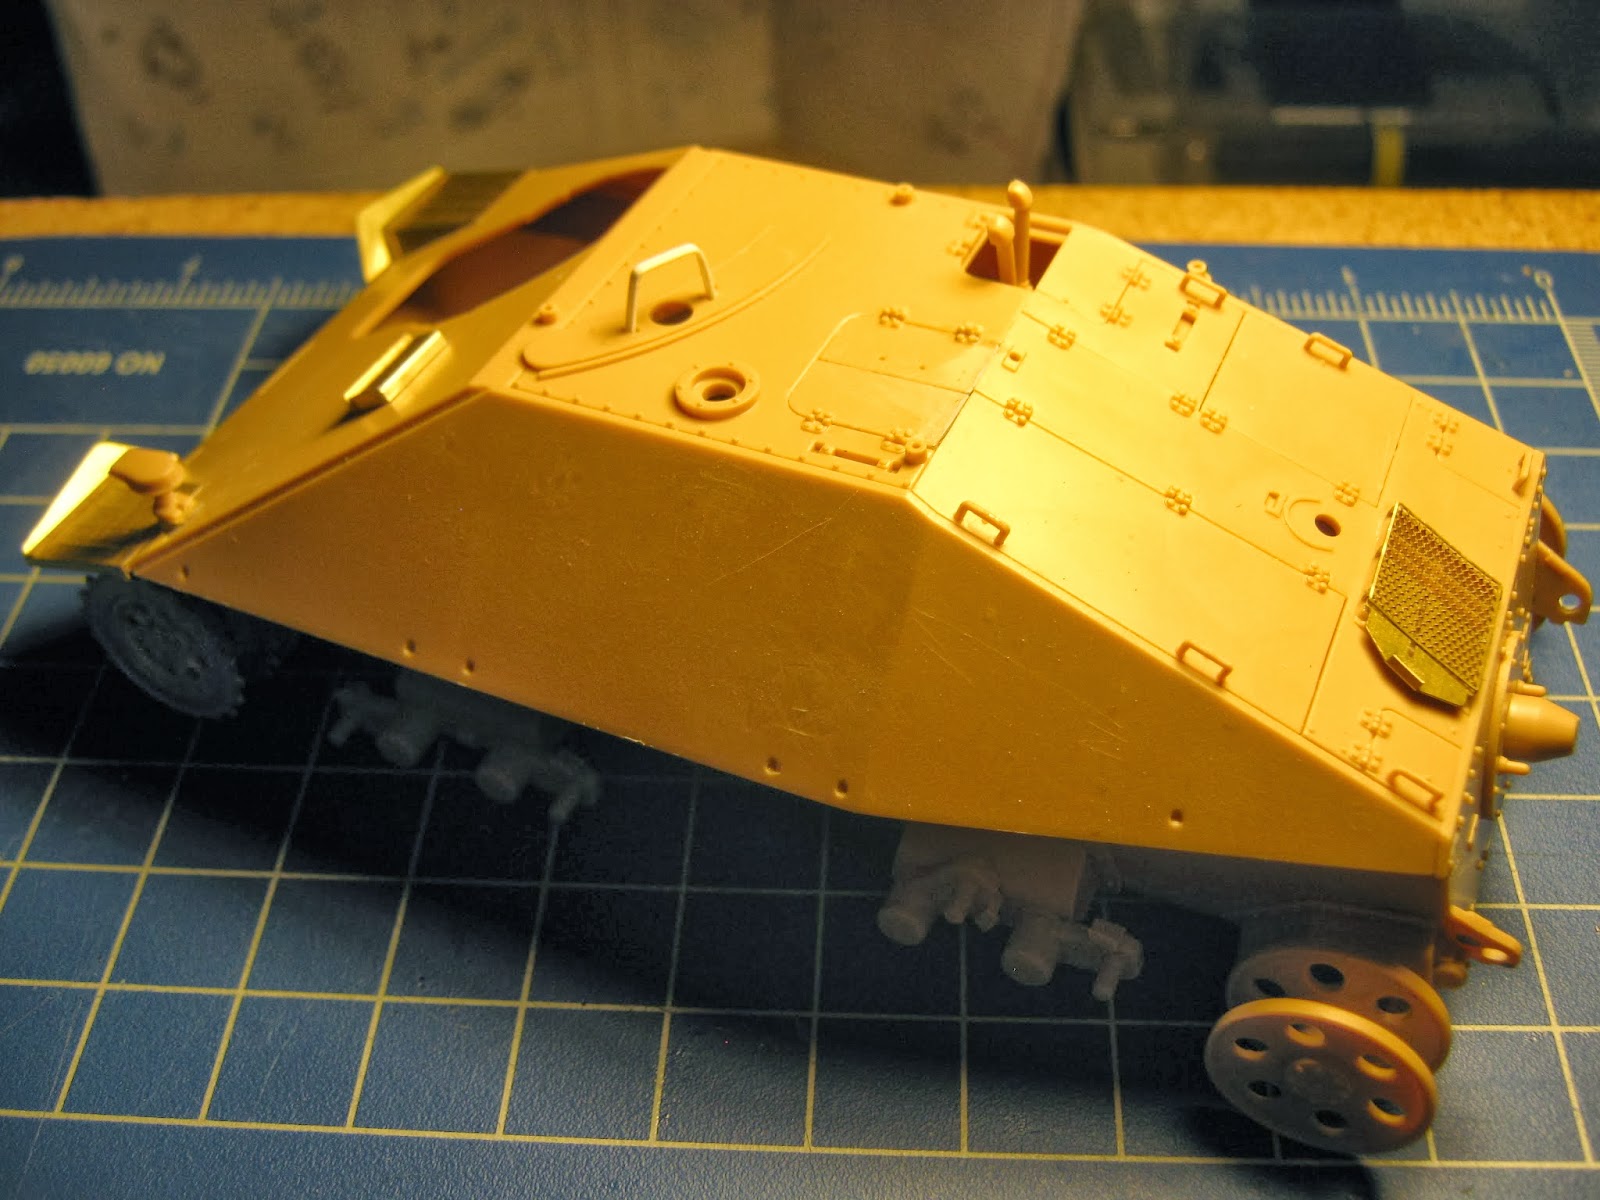
 I'm stressed. I'm having real difficulty working out what should be done next, the order of things. Because I have to coordinate the brass parts with the kit parts, and work out which parts can go on the vehicle and which parts need to be painted separately. So I go and find something little to do. This viewport is fairly robust and I'm not going to knock it off by careless handling. I think I can safely put this bit of brass on. But now I've started putting a few delicate bits on, I have to handle the model with a new level of care.

The periscope guard in the kit is too thick, and the brass part is too thin. I make this part out of styrene. Styrene has a lot of memory. I did not bend this part very well; I'll need to take another shot at it.
Here is the stanchion for the night light. I've committed myself to the higher level of care and handling. I'm going to start putting bits and pieces on. This photo reveals a bit of seam on the mounting, and also a gap between the brass and the hull. Like I say, I only really see these issues when I get the photos back. It will be easy to touch up the plastic part - done it already - but I must fill that gap. I'll run a bit of Araldite (epoxy) in there and then it will look like it was welded.
No stopping me now: on goes the light fitting itself.
Here is a photo of the real thing. Now if I still had that huge collection of spares I'd hunt through and find a nightlight whose shape is closer to the photo. The kit part is too flat and angular, and I've seen better. But I don't have that collection anymore. However, I have drilled a little hole for the wire and I can probably stick on some tiny bits of this or that to suggest the little bolts.


Here is the kit parts for the jack, and couple of photos of the real thing. The jack that comes in the kit has a folding handle (which is also too long). The photos I have in my book do not support that; they all show the handle locked in the 'use' position. I'll be making a new handle out of a bit of styrene rod - too easy. Even so, the jack kit parts are excellent. The jack always used to be two parts one of which the handle. This had six parts and they were very nice.

Looking now at the brass side of things, two filled ribs on the kit part are supposed to be handles. Off they come.


You can see the two hooks in this photo, outside of the mounting brackets.
These are the handles from the brass set (part 74). It's a nice gesture, and I appreciate it, but these are flat in section when they need to be round.  We do have metal rod of the correct diameter. So, it will not be hard to bend up two hooks and drill four holes.


The hatches were a bit short but I thought I'd go right ahead and glue them in anyway. What was I thinking. Disaster. So shameful I didn't take a picture (until now, when they are still not perfect but somewhat redeemed). Looking at the photos below, of an existing vehicles, there is some comfort to be had in seeing that the real hatches did not fit so precisely. I could even say I buggered up the hatches in a deliberate attempt to impart realism. No, I couldn't say that, so today I pulled them off and built up those short edges with a bit of putty. I expected to make things worse actually; this was just a last-ditch effort as I'd already resigned myself to making new hatches from styrene. But recovering the messed up hatches went surprisingly well and I have decided I can live with the overall result. Better luck next time. 


Time for a little round-up, parts that are not ready to go on the model yet, either because they need more work or will have to be painted separately. Clockwise from top left: rear fenders, the jack, tools from other kits that have been carefully cleaned up and refined (pick made pointy, axe made sharp etc), the one open hatch with its ejector pin marks filled (awaiting inner detail). Then there is the brass part that corresponds to the wooden block, mounted on the front trackguard, that is used with the jack. At the bottom are a few hooks I haven't put on yet, the periscope guides, the periscopes, and finally the metal box that sits on the trackguard. I seriously messed up the brass part but can fall back on the kit part, if I give it a bit of special attention. Or I can use the brass part as a template for a totally new part made from sheet metal.The kit gave me the towing cable eyes and said to use 'thread'. If you use actual thread you should soak it in aquadhere (PVA, wood glue) first, to 'plasticise' it and get rid of the tell-tale fibres. Far better to buy real cable from a hobby specialist - or an electronics shop.

Tools-wise, strangely, the kit came with only the crowbar and the shears. Missing is the axe, the shovel and the sledgehammer. So, here are some nice tools I prepared earlier (from other kits). They are not as was standard with this vehicle but who says a tank crew can't pinch a pick from somewhere. Or a nice tin can (easily made from a bit of sheet metal, the hard part is going to be the label). 
The brass set comes with brackets for all the tools but only provides for the shovel, this part here. I think I definitely have to shape it up and put it through its paces but I am a little worried. Easy enough to form the shovel blade part to the right curve but I am not sure how I should treat the mount part; just how will I roll that around the handle? Instructions just say to join it to a length of plastic rod - hmm. 


This is a close-up of the brass part for the jack block. I have not squared it perfectly and I have not filled it (with glue, putty or solder) because I won't be using it. This part is a valiant effort but it is not going to pass for wood grain at 1/35th. However, from it I understand not just the all-important dimensions but that the block was made up from three separate wooden blocks - presumably that was easier and cheaper than using a solid piece, perhaps it was stronger too. What I need is real wood but with a very fine grain. I have some bits of rock maple lying around and I think that will probably be just fine - bit of woodwork coming up. Then I will use the brass straps that come with this, and the wing nut :p

Starting to look like something! 

Friday, 7 March 2014

Day Four

Day Four. I cut out the gun mantle and gun parts. I won't be using the kit barrel, I have a special one coming in the post. This is a sub-assembly; I can't stick it together before the inner mantle  is painted, nor join it with the body of the model.


I am having a good time with the individual track links. They have no seams really, which means they only need to be drilled, so each link takes only a minute or so instead of ten. Comes with plenty of wire to make into pins to hold them together, and presumably quite a few spare track links too. I've assembled probably a fifth of them and only found one that was malformed, not fully cast. 

 Drilling.
And then you drop the pins in and run a tiny bit of superglue into the hole.I could clean these links up to perfection but it's not needed, the burs and tiny bits of flash on the links will count as dirt by the time I've finished.

Day Three

Time to start putting some brass parts in place. The front trackguards are not perfect but good enough. Somehow I place these two grilles perfectly. I am using this, the 5" 5-Speed Hold and Fold Tool from The Small Shop.  


The ribs on the tops of the trackguards are to be had by running a ball-point pen in these channels underneath.


I have a set of six points like the one pictured. I use the smallest size to push out the ribs. 


Bend the lip at the side and end. 


No trouble so far.


Just test-fitting top and bottom hull. Going together very nicely indeed, thanks Academy. 
I'll be filling where the hull parts meet atop the tracks, visible here at far right.


Time to face up to getting those front track guards off, as I cannot do any delicate work on the upper hull until that labour-intensive job is out of the way.


The first test of the Dremel saw wheel succeeds. I stay away from the edges, and clean up afterward with mainly the chisel blade.


I fit the newly made brass track guards, which overlap and hide the imperfect job I did with the edges, removing the kit material.


These two tubes are to do with housing antennae when not in use. They are only gestured at by the kit and, it seems, in the wrong place. I shave them away. I'll need to look in my tube and rod collection, maybe drill something out.


The aerial mount is drilled out. It's a bit rough but it's also very small.


The brackets for holding the shears in place on the track guard.These are mounted in a tucked away place. I'll need to paint the tool itself, and the brackets fixed to the track guard, separately, I think. I just put these away in my multi-compartment sub-assemblies box for now.

Because I wanted the two halves of the hull together at this stage, this range-finder has to go in now even though it will be hard to paint. Two  or three other little periscopes can still be painted separately so they are clean in their neat little slots (one slot visible very bottom right corner of this shot).


The hull is glued together now and it fitted beautifully. Now I can mount the track guards, and other fiddly brass stuff to the upper hull. I have already cleaned away the tiny bumps that in the kit represent rows of very small handles along the top sides of the hull; these will be built somehow. I will paint the inside matte black through the hole for the gun mount. 


Now I  can put this grille on the rear deck.


Tuesday, 4 March 2014

Day Two


Wheels. The Fruilmodel sprockets are much nicer than the kit parts. I have a choice with the rear idler between the early version with eight lightening holes, the later version with six, or the final and post-war four-hole. Tempted to use, along with the six-hole-, an early eight-hole idler to suggest some idler mishap has been remedied by salvaging from an earlier vehicle. It's a little implausible, but this replacement wheel could be painted differently and look fabulous.

The tyre on the left has edges a little too sharp so I stick the wheels on a drill bit in my Dremel and soften the edges a little. Not that this picture really shows that in the example on the right. 

This is how the suspension goes. 
Just balanced together, I see the return roller got away. But the suspension has quite a lot of play in it and I can and really should plan to take advantage of this by placing the vehicle on uneven terrain, eventually. This will all be going with individual articulate metal track links. But I don't have to make this decision any time in the near future, so the wheels and suspension come back off and they go in the box now, as a finished sub-assembly.  


This photo from the book tells me that the muffler's going to need work. The three kit parts are there and I can work with them or use them as a reference, along with these photos, to build something better. If I'm making this muffler from scratch I want a dent in it, and that's better modelled with sheet metal than by carving into plastic parts. The lead off champagne bottles is perfect if it's a regular shaped muffler, but this one is not, it's got a bend in it.


Lucky I went crazy that day at the tube vendor, and bought all those tubes and other handy sections too.


This tube matches almost perfectly. I'll have to ream out a bit of each end. Saw it at the right angle and join and probably fill the two sections. Put tasteful dent in before fitting so it doesn't come apart from the stress. Make the internal bracing we can see in the photograph. Drill out the exhaust itself. Sounds doable. But not right now; when I've got more of the 'infrastructure' in hand. 


The upper hull is beautifully moulded. Those front trackguards are going to have to be cut away and I have been worrying about that every night as I go to sleep. We are getting nearer and nearer to photo-etched brass territory and I feel some trepidation. I have filled the depression on the front glacis that would ordinarily receive an ordinary kit part, as per Eduard instruction. A brass fitting is going there.


I'm still at this stage most definitely steering around any troublesome decision-making or commitments. I feel I can safely assail the rear deck without falling foul of the brass tyrant.


I did not assemble this perfectly. I should have sanded the hatches in a few places so the gaps were all regular. It's only two places. I glued them lightly. Maybe I can go in and do *corrective surgery*.
Before I start with these brass parts I want of the kit in place. Once I have a conservative plastic foundation the brass parts will be constructed but not attached until they are all ready. If prematurely attached, I'm only going to knock them off no matter how hard I try to be careful.


These straps are about a centimeter long.


Yes, those are wing nuts and those are millimeters on my ruler below. But they are the limit with this medium; they are flat, two-dimensional representations. Maybe they can be fleshed out a little, somehow. I don't know where they go at this stage.